Brand Name Vegan

vegan low-waste lifestyle

  • Blog
  • Recipes
  • Zero Waste
IMG_2929.JPG

Plant-Based Power Scramble

May 03, 2020 by B Brand

Hi all! I hope everyone is staying safe and healthy!

If you were watching my Facebook page this weekend, you might have seen that I partnered with Animal Advocates of South Central PA to help raise money for plant-based meal kits for individuals experiencing homelessness who are currently living in the York YMCA’s residence. These folks have been hit hard by COVID-19 and we want to show you that you can care about people and animals at the same time - you don’t have to choose!

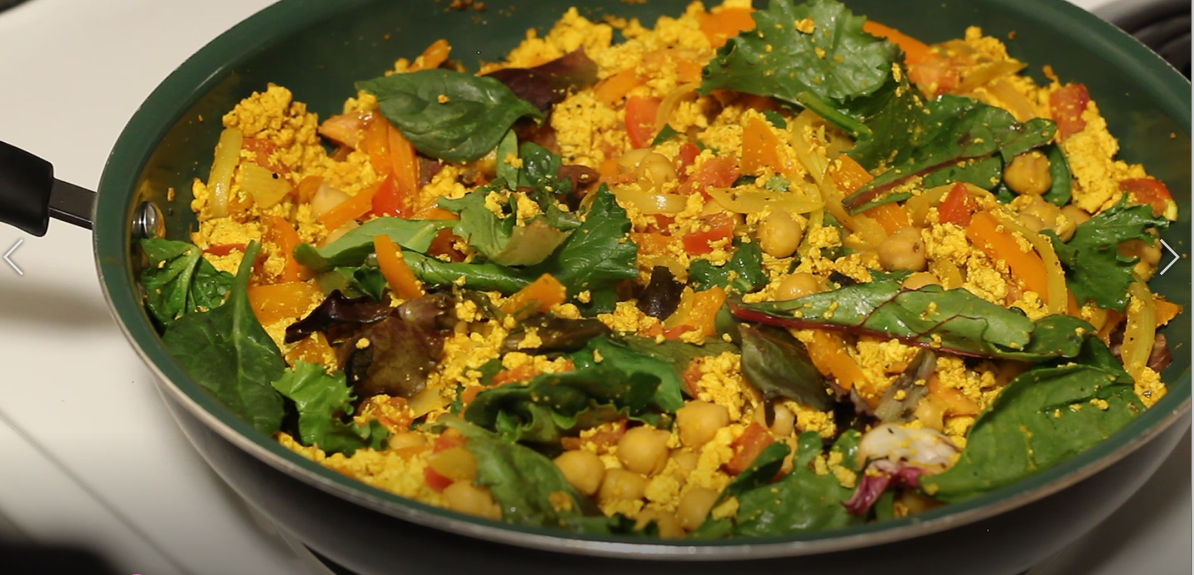
To help spread this positive message during Give Local York and raise money to spread the plant-based love and animal advocacy, I created this cooking demo for a meal I make ALL the time - a delicious Power Scramble! I call this a power scramble because I love adding an extra protein boost of garbanzo beans to a traditional tofu scramble, which also provides a good amount of iron!

This recipe is packed with protein; antioxidants from the bell pepper, tomato, and greens; and B vitamins from nutritional yeast! And perhaps the best part? It only takes 30 minutes to make! (You may have noticed a theme here…lol I like the vast majority of my meals to be quick and easy!)

Wonderful as a post-workout protein meal; breakfast; lunch; or dinner, I love eating this for breakfast on top of whole wheat seedy toast, for dinner with rice and roasted vegetables, or on top of a leafy green salad. Any way you serve it, you really can’t go wrong!

I hope you enjoy this as much as I do! Let me know in the comments if you liked this video and if I should make more! Thanks for reading, watching, and tuning in :) Cheers!

Plant-Based Power Scramble

Ingredients

  • 1 Tbsp. olive oil

  • 1 Tbsp. ACV

  • 1/2 large white onion, sliced

  • 1/2 bell pepper - I used orange, but you could use any color!

  • 1 tomato, diced

  • 1 package extra firm tofu (14-16oz)

  • 1 can chickpeas / garbanzo beans (15oz)

  • 1 1/2 Tbsp. nutritional yeast

  • 1 tsp. salt

  • 1 tsp. fresh cracked black pepper

  • 2 tsp. garlic powder

  • 2 tsp. turmeric

  • 2 tsp. oregano

  • 1/4 tsp. paprika

  • 1/8 tsp. chipotle powder

  • 1 cup mixed greens, spinach or kale

Make this 30-minute meal!

  1. Add 1 Tbsp. olive oil and 1 Tbsp. ACV to a large pan on medium-high heat.

  2. Slice the onion and add to the pan. Allow to sautée while you thinly slice the bell pepper, add to the pan, and stir.

  3. Add the salt and black pepper, as well as 1 tsp. garlic powder, 1 tsp. turmeric, and 1 tsp. oregano.

  4. Stir and allow to cook while you drain the tofu. Press the tofu gently but firmly between your hands over the sink to rid it of excess moisture. (Alternatively, you can use a tofu press, but I like the quick and easy version without any extra appliances to clean!)

  5. Crumble the tofu in the pan, then add the remaining garlic powder, turmeric, oregano, paprika and chipotle powder on top. Stir to combine.

  6. Dice a tomato, then add to the pan along with the nutritional yeast.

  7. Open a can of chickpeas, then drain the liquid and add the chickpeas to the pan without rinsing.

  8. Stir and add in the mixed greens, spinach or kale. Allow to wilt, then taste! If you feel it’s missing anything, feel free to add more garlic, salt, pepper, or an extra teaspoon of apple cider vinegar for a bit of a tang.

  9. Serve solo, on top of toast, with rice and quinoa, or on top of a salad! The possibilities are endless.

Bon appétit, and happy cooking!

May 03, 2020 /B Brand
easy, tofu scramble, power scramble, breakfast, lunch, dinner, protein, plant protein, protein packed, B vitamins, nutritional yeast, beans, tofu, 30 minute meal, 30 min meal, quick and easy, AASCPA, local, nonprofit
Comment
IMG_2777.jpg

Orange Chick’n Stir Fry with Carrots and Green Beans

April 05, 2020 by B Brand

Hi from PA, where we are staying home to flatten the curve!

While we are certainly experiencing an unprecedented situation - as a nation, as global citizens, as one people, one species - I can tell you one thing for sure: if you’re cooped up at home, you might as well cook!

When I am able to focus on the creativity of crafting a dish, everything else just melts away. I love being able to focus on the joy of experimentation, testing different flavors together, with the goal of creating a delicious dish that satisfies my craving of the moment. If I am able to focus on my freedom to create and experiment, cooking can feel surprisingly therapeutic!

Do you enjoy experimenting with different flavors and being creative in the kitchen? Do you also feel free and relaxed when you can cook without a time limit? Let me know in the comments! :)

IMG_2874 (3).JPG

This particular dish was inspired by the savory cover of this plant-based Mindful Chick’n, from Sweet Earth. In case you haven’t heard of them, Sweet Earth is a line of plant-based products by Nestle. Now before you go thinking I support Nestle (this conglomerate corporation has been known to do some pretty terrible things such as exploiting child labor) — I did not pay for this product, but got it for FREE through an app called Ibotta!

This is not a sponsored post, and I didn’t receive the Mindful Chick’n through any special means - just by being a normal Ibotta user! And this is why I recommend Ibotta to my friends. They often have plant-based offers and will give you money back on certain product purchases - for instance, $1.00 back if you buy Silk Oatmilk ice cream, $1.50 back on any Miyoko’s product, or get the full value back of a particular product, such as this Mindful Chick’n!

Check out these past Ibotta offers:

Screenshot_2019-12-02-17-31-48-1.png Screenshot_2019-12-02-17-24-42-1.png Screenshot_2019-12-02-17-31-08-1.png Screenshot_2019-12-02-17-31-54-1.png Screenshot_2019-12-02-17-31-33-1.png Screenshot_2019-12-02-17-32-04-1.png

Once you reach $20 in your Ibotta app, you can cash out and keep the money, or buy giftcards through the app. Ibotta also offers to add to your total if you’re going to cash out for a giftcard, OR use Pay with Ibotta, where you can pay for certain things using the app and get another discount. It’s pretty awesome!

To date, I have saved….drum roll….$375.72 by using the Ibotta app over the past 2 years!!

Screenshot_2020-04-05-11-37-17 (2).png Screenshot_2020-04-05-11-37-50 (2).png

If you’re interested in trying Ibotta and saving money on groceries, use my referral code: NPGDLGN

Or sign up using this link! → TRY IBOTTA AND SAVE ON GROCERIES, NEW PRODUCTS, AND EARN CASH BACK ON GROUPON, FOOD DELIVERY, AND MORE!

Ibotta helps me save money when trying new plant-based products, which is something I always look forward to! Plus, you can save 10 cents, 25 cents, 50 cents, or $1.00 (depending on the offer) just for redeeming any receipt and buying ANYTHING. That’s free money just for going grocery shopping! As you can see, those pennies add up! :)

Now back to the recipe! Since this was a dinner experiment and I didn’t plan on photographing this dish for my blog, I only have a few photos and, to be honest, they look a bit boring. When I make this again I will definitely try to update the photos on this post with some that look more…ap-peel-ing :) Orange you glad I made that joke? Ahem…

Whether you decide to go coupon-hunting to get a deal on this chick’n, download Ibotta to get some money back on your grocery receipt, or just try this recipe, this Vegan Orange Chick’n Stirfry is sure to be a hit with your plant-based friends and omnivores alike! Try this 30-minute meal for dinner today!


Orange Chick’n Stir Fry with Carrots and Green Beans

This fresh orange chick’n recipe will reaffirm your life choices in trying a plant-based diet!

IMG_2768.jpg

Stir-fry Ingredients

  • 1 Tbsp. olive oil

  • 1/2 large white onion, sliced

  • 1/2 cup baby carrots, sliced lengthwise into matchsticks

  • 1 + 1/2 cups green beans, cut into 4 in. pieces

  • 1 package Sweet Earth Mindful Chick’n, cut into 1-inch chunks

  • 1/4 cup soy sauce

  • 1.5 Tbsp. rice vinegar

  • 1/2 tsp. oregano

  • 2 tsp. garlic powder

  • 2 tsp. ground ginger

  • 1/4 tsp. salt

  • cracked black pepper to taste (approx. 1 tsp.)

  • dash of non-dairy milk

  • 1 cup mixed greens

Orange Sauce

  • 1 whole orange (peeled)

  • 2 Tbsp. apple cider vinegar

  • 2 Tbsp. water

  • 1 tsp. corn starch

Make this 30-minute Meal!

  1. Heat olive oil in a large pan or wok over medium-high heat. Add the sliced onion and cook until translucent, stirring occasionally.

  2. Add the sliced carrots, then green beans, soy sauce, garlic, ginger and oregano.

  3. Cut the chik’n into smaller pieces (approx. 1-inch chunks), then add to pan along with rice vinegar. Let cook while you make the sauce.

  4. To make the orange sauce: Peel an orange, then add the orange slices, apple cider vinegar, and water to a blender. Blend on high until smooth.

  5. Pour the sauce into the pan and allow to cook 1-2 mins. Add 1 tsp. corn starch to thicken. (If you like a thinner sauce, start with 1/2 tsp. corn starch and add more if needed!)

  6. Stir well and add salt and pepper. Let it cook, stirring occasionally.

  7. Add a dash of non-dairy milk (I used almond milk). This helps thin the sauce a bit and balance out the acidity from the vinegar.

  8. Cook for another minute or two, then stir in 1 cup mixed greens. Allow the greens to wilt, then it’s ready to serve!

  9. Serve over rice, grains, or on a bed of leafy greens. I served this Orange Chick’n Stir Fry over white rice seasoned with salt, pepper, garlic and ginger. Add walnuts or pistachios (optional) for an extra crunch!

Serves 3-4. Store in a container in the fridge.

Stay safe, stay healthy, and Enjoy!

April 05, 2020 /B Brand
recipe, recipes, Asian, orange, orange chicken, chick'n, vegan chicken, chickun, stirfry, stir-fry, stir fry, quarantine, cooking, homecooked, stay at home, coronavirus, covid19, covid-19, stay safe
1 Comment
IMG_127428229.jpg edited

Savory Pinto Bean Stew

February 12, 2020 by B Brand

It’s still winter here in PA, about 36 degrees with a brisk chill in the air - but because it’s so cold, this weather is perfect for some warming, flavorful stew!

This dish is one of those thirty-minute meals where, if you throw on a pot of rice when you start the stew, it will all come together in just half an hour! So quick, easy, and delicious.

IMG_1307.jpg

Did you know that beans are a nutritional powerhouse? Full of fiber, folate, and B vitamins, pinto beans are also capable of reducing LDL (also known as “bad” cholesterol). And, they help fuel gut health!

Not convinced that beans could be so healthy AND be the star of your main dish? Try this recipe and you will be a believer! (Or should I say bean-liever? You can’t “bean” it!) ;)

Okay, enough of my puns. Let’s eat!

Savory Pinto Bean Stew

Featuring a rainbow of red onion, bell pepper, garlic and apple cider vinegar, this colorful stew will have you savoring the tang and going for seconds!

IMG_1274 (3).JPG

Ingredients

  • 1/2 red onion, diced

  • 1/2 red bell pepper, diced (I used oven-roasted bell peppers, which are even better!)

  • 1/2 orange or yellow bell pepper, diced

  • 1 Tbsp. olive oil

  • 1 Tbsp. ACV (apple cider vinegar)

  • 1 can organic pinto beans

  • 1 medium-large tomato, diced

  • 1 tsp. chili powder

  • 1 tsp. garlic powder

  • 1 tsp. oregano

  • 1/2-1 tsp. fresh cracked black pepper

  • 1/4 tsp. salt

  • 1 Tbsp. nutritional yeast

  • 1/4 cup water

Let’s Make It

  1. Heat olive oil in a deep pan or medium pot. (I used a large pan for this recipe - your preference!)

  2. Add the chopped onion, cooking over medium-high heat until onions are translucent.

  3. Add the ACV, black pepper, salt, garlic, and chili powder, then stir in the can of pinto beans.

  4. Mix in the oregano and nutritional yeast, and allow to simmer at least 20 minutes. Add water if it becomes too thick. I added 1/4 cup of water for my desired consistency.

  5. Add salt and black pepper, to taste.

  6. Serve over rice alongside roasted sweet potatoes, peppers, and cauliflower. (This would make a great side, too, or just a comforting bowl of stew on a cold day!)

Serves 2-3 but can easily be doubled or made in larger batches. Store in a container in the fridge.

Bon appétit!

February 12, 2020 /B Brand
Comment
IMG_0279.jpg

Roasted Fall Vegetables

November 22, 2019 by B Brand

Who’s ready for Thanksgiving?!?!?

Okay, okay, I’ll calm down, I promise. I just get so excited for Thanksgiving because it is my absolute favorite holiday!

Truth is, if you harbor even an inkling of what I enjoy (hello, food blog, lol), then you can imagine I get pretty stoked about a day that revolves around cooking, eating, gratitude, and family. Having spent most of my Thanksgivings with my immediate family, who are a small but rambunctious bunch when you put us all in the same room, this has always been my favorite holiday since I was a teen just due to the sheer deliciousness and focus on the food!

IMG_0228+%283%29.jpg

There is something so soul-warming about sitting down to a meal with familiar loving faces, sharing your thoughts on why you are thankful, and enjoying every bite of your homey, aromatic, abundant meal. The end of the year is near and you can feel the warmth of love and comfort in your cozy home. My Norwegian friends would call this koselig – the intangible element of cozy atmosphere, lovely feelings, warmth and contentedness. (And the warmth of apple pie! And pumpkin pie! And maybe even pecan pie…and brownies…?)

IMG_0200+%283%29.jpg

Not to mention the drinks! I don’t drink much alcohol these days, but I always loved the hot apple cider my mom would simmer in a crock pot all day long, adorned with fresh cinnamon sticks bobbing on top of that liquid gold, sporting delicious, sweet apple steam.

I might have a gin & tonic this year…

IMG_0235.jpg

I am so overjoyed to say that my family will be sharing a vegan Thanksgiving this year. As we rapidly approach my 5 year “veganniversary”, I am ever more grateful to see my family making changes that are better for their bodies (eating more greens and less meat) and better for the animals with whom we share this earth. But more on that later! It’s time to get cooking!

IMG_0229.jpg
 
IMG_0300 (3).JPG

I hope you enjoy this recipe for roasted fall vegetables. This is just one of the dishes I will be bringing to our vegan Thanksgiving feast. Stay tuned for more fall flavors! :)

IMG_0251+%282%29.jpg
 

Roasted Fall Vegetables

Delicious delicata squash, bright pink radishes, bell peppers, and broccoli are turned into a rich roasted vegetable side or main with just a sprinkling of spices and olive oil!

IMG_0292%2B%25282%2529.jpg

Ingredients

  • 1 medium delicata squash, sliced into 1-in. thick crescents

  • 2 bell peppers (yellow/red/orange), sliced into 3-4 in. pieces

  • 1 bunch radishes, cut into halves

  • 2 heads broccoli, chopped (or 3 cups frozen broccoli)

  • 1 large white onion, cut into quarters or eighths

  • Organic olive oil (2-4 Tbsp.)

  • Himalayan pink salt (approx 2 tsp.)

  • Fresh ground black pepper (approx. 2 tsp.)

  • Garlic powder (approx. 2 tsp.)

  • Chili powder (approx. 1 tsp.)

Instructions

  1. Wash and chop all the vegetables. (Save your radish greens if they came with tops! If they’re fresh, you can use them in a salad. If they’re a bit wilted, you can throw them in the freezer to go into soup stock later. Save your squash ends, pepper cores, and broccoli scraps, while you’re at it!)

  2. Preheat the oven to 360° F

  3. Arrange vegetables as desired on two non-stick baking sheets. Pour 1-2 Tbsp. olive oil over each sheet of vegetables.

  4. Sprinkle salt, pepper, garlic powder, and chili powder over both sheets.

  5. Bake both sheets (top & bottom rack) for 15 minutes, then remove and stir the vegetables to ensure the bottoms will not burn.

  6. Bake for an additional 15 minutes.

  7. Remove from the oven. The vegetables should be pretty well cooked by this point, a nice golden brown. (You can bake for an additional 5-10 minutes after stirring again, if desired. Turn off the oven and remove vegetables.)

  8. Serve as a side dish or over rice.

Tip: As you’re serving, if you want to keep the vegetables warm for a second helping, leave them in the oven after you’ve turned it off to keep them nice and toasty.

Store in a container in the fridge.

IMG_0288.jpg

Bon appétit!

November 22, 2019 /B Brand
Comment
IMG_0554+%282%29.jpg

Easy Homemade Vegetable Broth

November 12, 2019 by B Brand

Baby it’s cold outside, and with some pretty frigid temps forecasted for this week, hibernating with homemade soup sounds like the perfect way to warm up!

The best way to start? Save your vegetable ends as you use them - garlic skins, potato peels, parsley stems, onion ends, tomato cores….that lettuce you had the best intentions for, but it went limp too quickly in your fridge…. Just pop all of those odds and ends in a container in the freezer, and before you know it you’ll be filling up a pot! (Screw the Arctic Blast - we’re here for some soul-warming homemade veggie broth!)

I absolutely love this recipe because it is so simple, flavorful, and thrifty! There is really no better way to recycle your zucchini ends, squash seeds and eggplant scraps. (Just please use good judgement as far as freshness goes! Throw your moldy bits in the compost, and save your fresh garlic scraps for your broth.)

IMG_0562+%282%29.jpg

The best part of this broth? Making something out of nothing.

Enjoy!

How to Make it:

  1. Remove the vegetable scraps from your freezer which you had set aside.

  2. Fill a large pot with one part vegetable scraps and two parts water. Be sure to leave at least a few inches at the top so the water has room to boil.

  3. Place on high heat until the water boils, then reduce to medium-high heat.

  4. Simmer, covered, for 45 mins. (I opted not to salt the broth, but when I make soup I always add plenty of spices. It’s up to you if you decide to salt your broth in this process or save that for later.)

  5. Remove from heat and allow to cool before placing in the fridge. The vegetables will have lost their vibrancy, but imparted lovely flavor into the liquid!

  6. If using for homemade soup immediately, use a strainer to scoop out the vegetable scraps and set aside the scraps for compost. Careful, they will be hot! (A strainer is great because it will help you catch and remove the seeds from any citrus or seedy peppers you may have added.)

  7. If setting aside for another day, remove scraps with a strainer, then store in the fridge for up to 7 days.

There you have it! So simple, easy, and fresh.

Plus, it’s free! Why buy vegetable stock for the holiday season when you can just make it yourself out of odds and ends that would otherwise pile up simply to become soil?

Happy cooking!

November 12, 2019 /B Brand
stock, vegetable stock, veggie stock, broth, veggie broth, vegetable broth, healthy, homemade, antioxidant, soup, soupy, homecooked, eat your veggies, reuse, reduce, recycle
Comment
IMG_0961 (2).JPG

Asian Coconut Tofu Stir-Fry

November 01, 2019 by B Brand

I love a warm, filling stir-fry on a chilly fall day.

While I may not be the first to embrace the transition from hot, toasty summer to the brisk chill of autumn air, I do love watching the leaves turn from green to yellow, red, and orange. It’s a gorgeous site to walk beneath vibrant red foliage, in perfect contrast against a spotted yellow background, with a sprinkling of green mixed in. Mother Nature sure does know what she’s doing. :)

Similar to the beautiful autumn leaves, this dish will warm you up from the inside out, with a rainbow of red cubanelles, orange peppers, and rich green bok choy.

This recipe was inspired by the beautiful red cubanelle peppers we received from our local CSA this month. After a taste of these “sweet heat” peppers, I decided to order a case of cubanelles to chop and freeze for use throughout the winter — perfect for roasting, stir-fries and tofu scrambles.

While these cubanelles are known for their mild “sweet” heat, they can range in spiciness and be hotter than expected - it just depends on the pepper. The pepper’s oils can also remain on your skin after handling, so it’s best to wear reusable gloves when cutting or chopping, and wash your hands thoroughly when you’re done. (I didn’t bother to use gloves, and I experienced the resulting burning itch on my fingers after washing my hands multiple times. The sensation faded after a few hours, but just beware of the risks if you brave these peppers head-on like I did!)

IMG_1207.jpg

This stir-fry features organic bell peppers, onion, cabbage and bok choy from our local CSA, just to name a few ingredients!

I also used turnip stems from this week’s share, in place of where you may traditionally think to use scallions, to provide a similar textural dimension. Turnip stems don’t have the same flavor as green onions, but they have a similar light, earthy freshness that plays well against the spicy pepper and sweet, rich coconut milk in this dish!

IMG_0785.JPG

This stir-fry is perfect for cold and flu season, with plenty of garlic and ginger to boost your immune system, in addition to a healthy dose of vitamin C from the bright cubanelle pepper. Not to mention the myriad of antioxidants present in all these fresh veggies, which help to fight off free radicals in your body!

IMG_0887+%282%29.jpg
IMG_0908 crop (2).JPG

Flavorful, colorful, rich and robust, this spicy Asian stir-fry is hearty and delicious, complete with the tang of rice vinegar and sweet, thick coconut milk. I hope you enjoy this recipe as much as we did!

IMG_0942 cropped (2).jpg

Asian Coconut Tofu Stir-Fry

Ingredients

  • 1 Tbsp. organic olive oil

  • 1/2 large white or yellow onion, diced

  • 1/4 cup diced turnip stems (or sub scallions)

  • 1/2 orange bell pepper, diced

  • 1/2 red cubanelle pepper, thinly sliced into 2-in strips

  • 1/3 cup or 3 leaves bok choy, loosely chiffonade cut

  • 1/3 - 1/2 cup chopped cabbage

  • 1 tsp. garlic powder (or 2 garlic cloves)

  • 1/2 tsp. ground ginger

  • 1/2 tsp. chili powder (omit or use less if you don’t love spicy food)

  • 1/2 can full-fat coconut milk (water + coconut cream), OR 1/2 cup coconut cream

  • 1 (14 oz.) package tofu, drained and cubed

  • 2 Tbsp. soy sauce

  • 1 + 1/2 Tbsp. rice vinegar

  • fresh ground black pepper, to taste (approx. 1/4 tsp)

  • pinch salt, if desired

  • optional: parsley for garnish

  • Rice of your preference, cooked to package instructions

Method

  1. Warm a large pan to medium-high heat and add 1 Tbsp. olive oil and 1 Tbsp. rice vinegar.

  2. Dice onion and let cook while you chop the bell pepper and turnip stems (or scallions), then add to the pan.

  3. Stir in the garlic, ginger, and black pepper. Mix in the cabbage and 1 Tbsp. soy sauce.

  4. Wear reusable gloves to slice and add the cubanelle pepper, stirring occasionally.

  5. While the veggies are sautéeing, drain the water from the tofu and gently press between your hands - over the sink or a towel - to rid excess moisture. (If you have a tofu press, feel free to use that!) Cut the tofu into 1-in cubes.

  6. Add tofu, chili powder, and remaining soy sauce to the pan. Mix in coconut cream.

  7. Prepare rice of your choice according to package instructions. (I used a mixture of 2/3 organic white rice and 1/3 organic wheat berries. I highly recommend using a rice cooker - you get great rice every time!)

  8. Simmer for 5-10 mins, stirring occasionally. Add the bok choy and pinch of salt, if desired.

  9. Taste and evaluate the flavor. Add more black pepper and another 1/2 Tbsp. rice vinegar, if desired.

  10. Let cook for another minute or two, then remove from heat and serve over rice with parsley garnish. Serves 2-4

IMG_0931 (3).JPG

Bon appétit!

November 01, 2019 /B Brand
Comment

© Brand Name Vegan 2024